In this tutorial, we will see how to use data table in next js 13 with shadcn ui. First you need to setup next js 13 with shadcn ui project.
how to use shadcn ui in next js 13
Before use data table in next js 13 with shadcn ui you need to install npx shadcn-ui@latest add table and npm install @tanstack/react-table.
npx shadcn-ui@latest add table
// or
npx shadcn-ui@latest add
Add tanstack/react-table dependency.
npm install @tanstack/react-table
1. Create next js 13 with shadcn ui data table with search filter, row actions pagination, sorting, visibility.
"use client"

import * as React from "react"
import {
  ColumnDef,
  ColumnFiltersState,
  SortingState,
  VisibilityState,
  flexRender,
  getCoreRowModel,
  getFilteredRowModel,
  getPaginationRowModel,
  getSortedRowModel,
  useReactTable,
} from "@tanstack/react-table"
import { ArrowUpDown, ChevronDown, MoreHorizontal } from "lucide-react"

import { Button } from "@/components/ui/button"
import { Checkbox } from "@/components/ui/checkbox"
import {
  DropdownMenu,
  DropdownMenuCheckboxItem,
  DropdownMenuContent,
  DropdownMenuItem,
  DropdownMenuLabel,
  DropdownMenuSeparator,
  DropdownMenuTrigger,
} from "@/components/ui/dropdown-menu"
import { Input } from "@/components/ui/input"
import {
  Table,
  TableBody,
  TableCell,
  TableHead,
  TableHeader,
  TableRow,
} from "@/components/ui/table"

const data: Payment[] = [
  {
    id: "m5gr84i9",
    amount: 316,
    status: "success",
    email: "[email protected]",
  },
  {
    id: "3u1reuv4",
    amount: 242,
    status: "success",
    email: "[email protected]",
  },
  {
    id: "derv1ws0",
    amount: 837,
    status: "processing",
    email: "[email protected]",
  },
  {
    id: "5kma53ae",
    amount: 874,
    status: "success",
    email: "[email protected]",
  },
  {
    id: "bhqecj4p",
    amount: 721,
    status: "failed",
    email: "[email protected]",
  },
]

export type Payment = {
  id: string
  amount: number
  status: "pending" | "processing" | "success" | "failed"
  email: string
}

export const columns: ColumnDef<Payment>[] = [
  {
    id: "select",
    header: ({ table }) => (
      <Checkbox
        checked={table.getIsAllPageRowsSelected()}
        onCheckedChange={(value) => table.toggleAllPageRowsSelected(!!value)}
        aria-label="Select all"
      />
    ),
    cell: ({ row }) => (
      <Checkbox
        checked={row.getIsSelected()}
        onCheckedChange={(value) => row.toggleSelected(!!value)}
        aria-label="Select row"
      />
    ),
    enableSorting: false,
    enableHiding: false,
  },
  {
    accessorKey: "status",
    header: "Status",
    cell: ({ row }) => (
      <div className="capitalize">{row.getValue("status")}</div>
    ),
  },
  {
    accessorKey: "email",
    header: ({ column }) => {
      return (
        <Button
          variant="ghost"
          onClick={() => column.toggleSorting(column.getIsSorted() === "asc")}
        >
          Email
          <ArrowUpDown className="ml-2 h-4 w-4" />
        </Button>
      )
    },
    cell: ({ row }) => <div className="lowercase">{row.getValue("email")}</div>,
  },
  {
    accessorKey: "amount",
    header: () => <div className="text-right">Amount</div>,
    cell: ({ row }) => {
      const amount = parseFloat(row.getValue("amount"))

      // Format the amount as a dollar amount
      const formatted = new Intl.NumberFormat("en-US", {
        style: "currency",
        currency: "USD",
      }).format(amount)

      return <div className="text-right font-medium">{formatted}</div>
    },
  },
  {
    id: "actions",
    enableHiding: false,
    cell: ({ row }) => {
      const payment = row.original

      return (
        <DropdownMenu>
          <DropdownMenuTrigger asChild>
            <Button variant="ghost" className="h-8 w-8 p-0">
              <span className="sr-only">Open menu</span>
              <MoreHorizontal className="h-4 w-4" />
            </Button>
          </DropdownMenuTrigger>
          <DropdownMenuContent align="end">
            <DropdownMenuLabel>Actions</DropdownMenuLabel>
            <DropdownMenuItem
              onClick={() => navigator.clipboard.writeText(payment.id)}
            >
              Copy payment ID
            </DropdownMenuItem>
            <DropdownMenuSeparator />
            <DropdownMenuItem>View customer</DropdownMenuItem>
            <DropdownMenuItem>View payment details</DropdownMenuItem>
          </DropdownMenuContent>
        </DropdownMenu>
      )
    },
  },
]

export default function DataTableDemo() {
  const [sorting, setSorting] = React.useState<SortingState>([])
  const [columnFilters, setColumnFilters] = React.useState<ColumnFiltersState>(
    []
  )
  const [columnVisibility, setColumnVisibility] =
    React.useState<VisibilityState>({})
  const [rowSelection, setRowSelection] = React.useState({})

  const table = useReactTable({
    data,
    columns,
    onSortingChange: setSorting,
    onColumnFiltersChange: setColumnFilters,
    getCoreRowModel: getCoreRowModel(),
    getPaginationRowModel: getPaginationRowModel(),
    getSortedRowModel: getSortedRowModel(),
    getFilteredRowModel: getFilteredRowModel(),
    onColumnVisibilityChange: setColumnVisibility,
    onRowSelectionChange: setRowSelection,
    state: {
      sorting,
      columnFilters,
      columnVisibility,
      rowSelection,
    },
  })

  return (
    <div className="w-full">
      <div className="flex items-center py-4">
        <Input
          placeholder="Filter emails..."
          value={(table.getColumn("email")?.getFilterValue() as string) ?? ""}
          onChange={(event) =>
            table.getColumn("email")?.setFilterValue(event.target.value)
          }
          className="max-w-sm"
        />
        <DropdownMenu>
          <DropdownMenuTrigger asChild>
            <Button variant="outline" className="ml-auto">
              Columns <ChevronDown className="ml-2 h-4 w-4" />
            </Button>
          </DropdownMenuTrigger>
          <DropdownMenuContent align="end">
            {table
              .getAllColumns()
              .filter((column) => column.getCanHide())
              .map((column) => {
                return (
                  <DropdownMenuCheckboxItem
                    key={column.id}
                    className="capitalize"
                    checked={column.getIsVisible()}
                    onCheckedChange={(value) =>
                      column.toggleVisibility(!!value)
                    }
                  >
                    {column.id}
                  </DropdownMenuCheckboxItem>
                )
              })}
          </DropdownMenuContent>
        </DropdownMenu>
      </div>
      <div className="rounded-md border">
        <Table>
          <TableHeader>
            {table.getHeaderGroups().map((headerGroup) => (
              <TableRow key={headerGroup.id}>
                {headerGroup.headers.map((header) => {
                  return (
                    <TableHead key={header.id}>
                      {header.isPlaceholder
                        ? null
                        : flexRender(
                            header.column.columnDef.header,
                            header.getContext()
                          )}
                    </TableHead>
                  )
                })}
              </TableRow>
            ))}
          </TableHeader>
          <TableBody>
            {table.getRowModel().rows?.length ? (
              table.getRowModel().rows.map((row) => (
                <TableRow
                  key={row.id}
                  data-state={row.getIsSelected() && "selected"}
                >
                  {row.getVisibleCells().map((cell) => (
                    <TableCell key={cell.id}>
                      {flexRender(
                        cell.column.columnDef.cell,
                        cell.getContext()
                      )}
                    </TableCell>
                  ))}
                </TableRow>
              ))
            ) : (
              <TableRow>
                <TableCell
                  colSpan={columns.length}
                  className="h-24 text-center"
                >
                  No results.
                </TableCell>
              </TableRow>
            )}
          </TableBody>
        </Table>
      </div>
      <div className="flex items-center justify-end space-x-2 py-4">
        <div className="flex-1 text-sm text-muted-foreground">
          {table.getFilteredSelectedRowModel().rows.length} of{" "}
          {table.getFilteredRowModel().rows.length} row(s) selected.
        </div>
        <div className="space-x-2">
          <Button
            variant="outline"
            size="sm"
            onClick={() => table.previousPage()}
            disabled={!table.getCanPreviousPage()}
          >
            Previous
          </Button>
          <Button
            variant="outline"
            size="sm"
            onClick={() => table.nextPage()}
            disabled={!table.getCanNextPage()}
          >
            Next
          </Button>
        </div>
      </div>
    </div>
  )
}
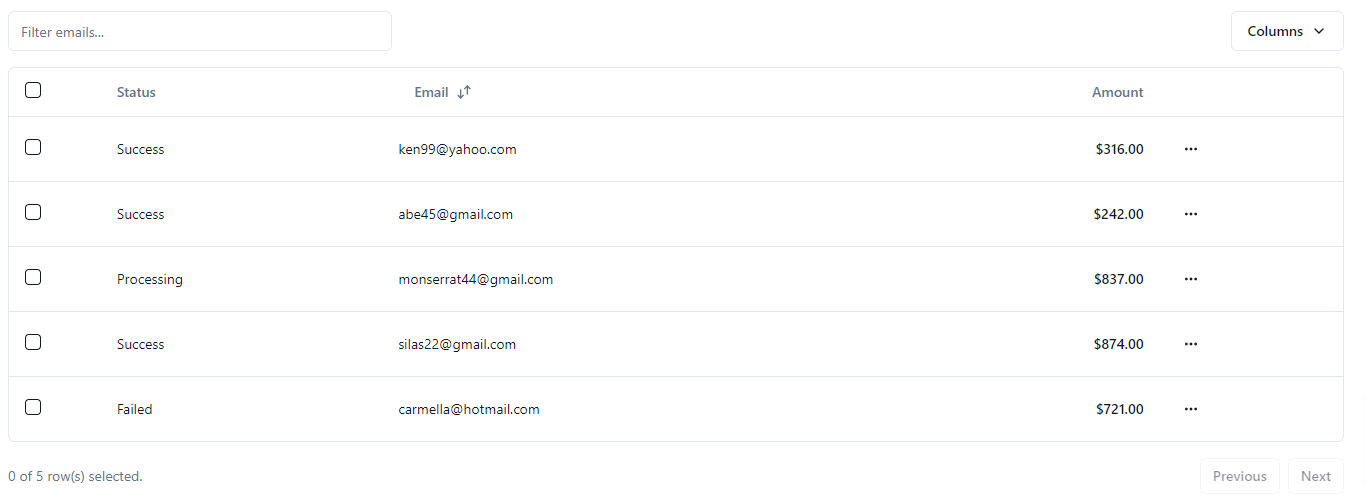
data table next 13 with shadcn ui
For more details https://ui.shadcn.com/docs/components/data-table
Related Posts
create a accordion in nextjs 13 with shadcn ui
create sidebar in next 13 with shadcn ui
create footer section in next 13 with shadcn ui
create file upload in nextjs 13 with shadcn ui
next 13 with shadcn ui input field example
next 13 with shadcn ui cards example
next 13 with shadcn ui search bar example
next 13 with shadcn ui login page example
next 13 with shadcn ui sign up form example
next 13 with shadcn ui radio group example
next 13 with shadcn ui buttons example
next 13 with shadcn ui pagination example
next 13 with shadcn ui table example
next 13 with shadcn ui checkbox example
next 13 with shadcn ui dropdown menu example
how to use skeleton loading next 13 with shadcn ui
how to use modal dialog next 13 with shadcn ui
how to use tabs next 13 with shadcn ui
how to use toggle switch next 13 with shadcn ui
